Wednesday, August 1, 2012

Rose Cabochon Earrings Tutorial

Supplies for this project:

2 Brass filigree settings - Secret Solace Supplies
2 Small rose cabochons - Secret Solace Supplies
2 Teardrop pearls 
2 8mm round pearls
2 Ball head pins
2 Head pins
2 Earring wires
Glue - I used E6000
Alcohol Ink - I used Tim Holtz - Cranberry
Sealer - I used Delta gloss varnish
Paint brush
Cotton swab
Round nose pliers
Wire cutters


Protect your work surface, alcohol ink is messy! 
Load the cotton swab with alcohol ink and dab it on the brass cabochon filigree settings.
Coat one side of each setting and once dry, coat the other side. Apply a second coat of ink if needed.

Once the settings are dry, apply a coat of sealer. Move the settings around a few times while they are drying so  the sealer does not adhere them to your work surface. Repeat for the other side.

While the sealer is drying, prepare the pearls.

Place a ball head pin in each of the teardrop pearls. Make a loop at the top of the pearl by bending the wire to one side of the pearl. Now wrap the wire in the opposite direction around one jaw of the round nose pliers. Use the wire cutters to remove the excess wire.

Use the wire cutters to cut the head off of the head pins. Using the round nose pliers, make a loop at one end of the head pin, insert the head pin into one of the round pearls and make a loop at the other end. Use the wire cutters to remove the excess wire.
Here are the 2round pearls completed.

All of the pearls completed.

In the photos above, I used 20ga artistic wire on the round pearls. However, the 20ga wire was too thick to fit in the tiny space on the setting. Here's the round pearl using the head pin.

Once the brass filigree settings are dry, glue the rose cabochons onto the settings.

Assemble the earrings:
Hook the loop at the top of the teardrop pearl into a space at the bottom of the setting. Close the loop with the round nose pliers. Attach one of the loops on the round pearl to the space on the setting directly across from the teardrop pearl. Close the loop with the round nose pliers. Attach the second loop on the round pearl to the earring wire and close the loop with the round nose pliers.
Repeat for the second earring.

Your done!


Thursday, July 5, 2012

Polymer Clay Rose Tutorial


I did a few polymer clay rose tutorials on my other blog - BareMoose. They seem to be fairly popular so I thought I would share one here. I will do my best to guide you through making the rose and then turning them into earrings.

Here are the finished earrings. I am unable to make 2 roses exactly the same so I didn't even try. I think they are cute and fun even though they aren't identical.
If I'm desperate to have roses that are the same, I make about 25 of them and select the 2 that look the most alike.


Materials:
Polymer Clay - I used Sculpey Premo Accents - Magenta Pearl
Earring Wires
2 Head Pins
Wire Cutters
Round Nose Pliers
Chain Nose Pliers


Start by conditioning your clay. You can use a pasta machine or just knead the clay with your hands.
Once the clay is soft and workable, roll it into a ball and then into a long snake.
Pull small pieces of the clay off and roll each piece into a ball.

Now flatten all the clay balls with your fingers. I am never concerned with the shape of the flattened pieces, it just doesn't matter for this project.
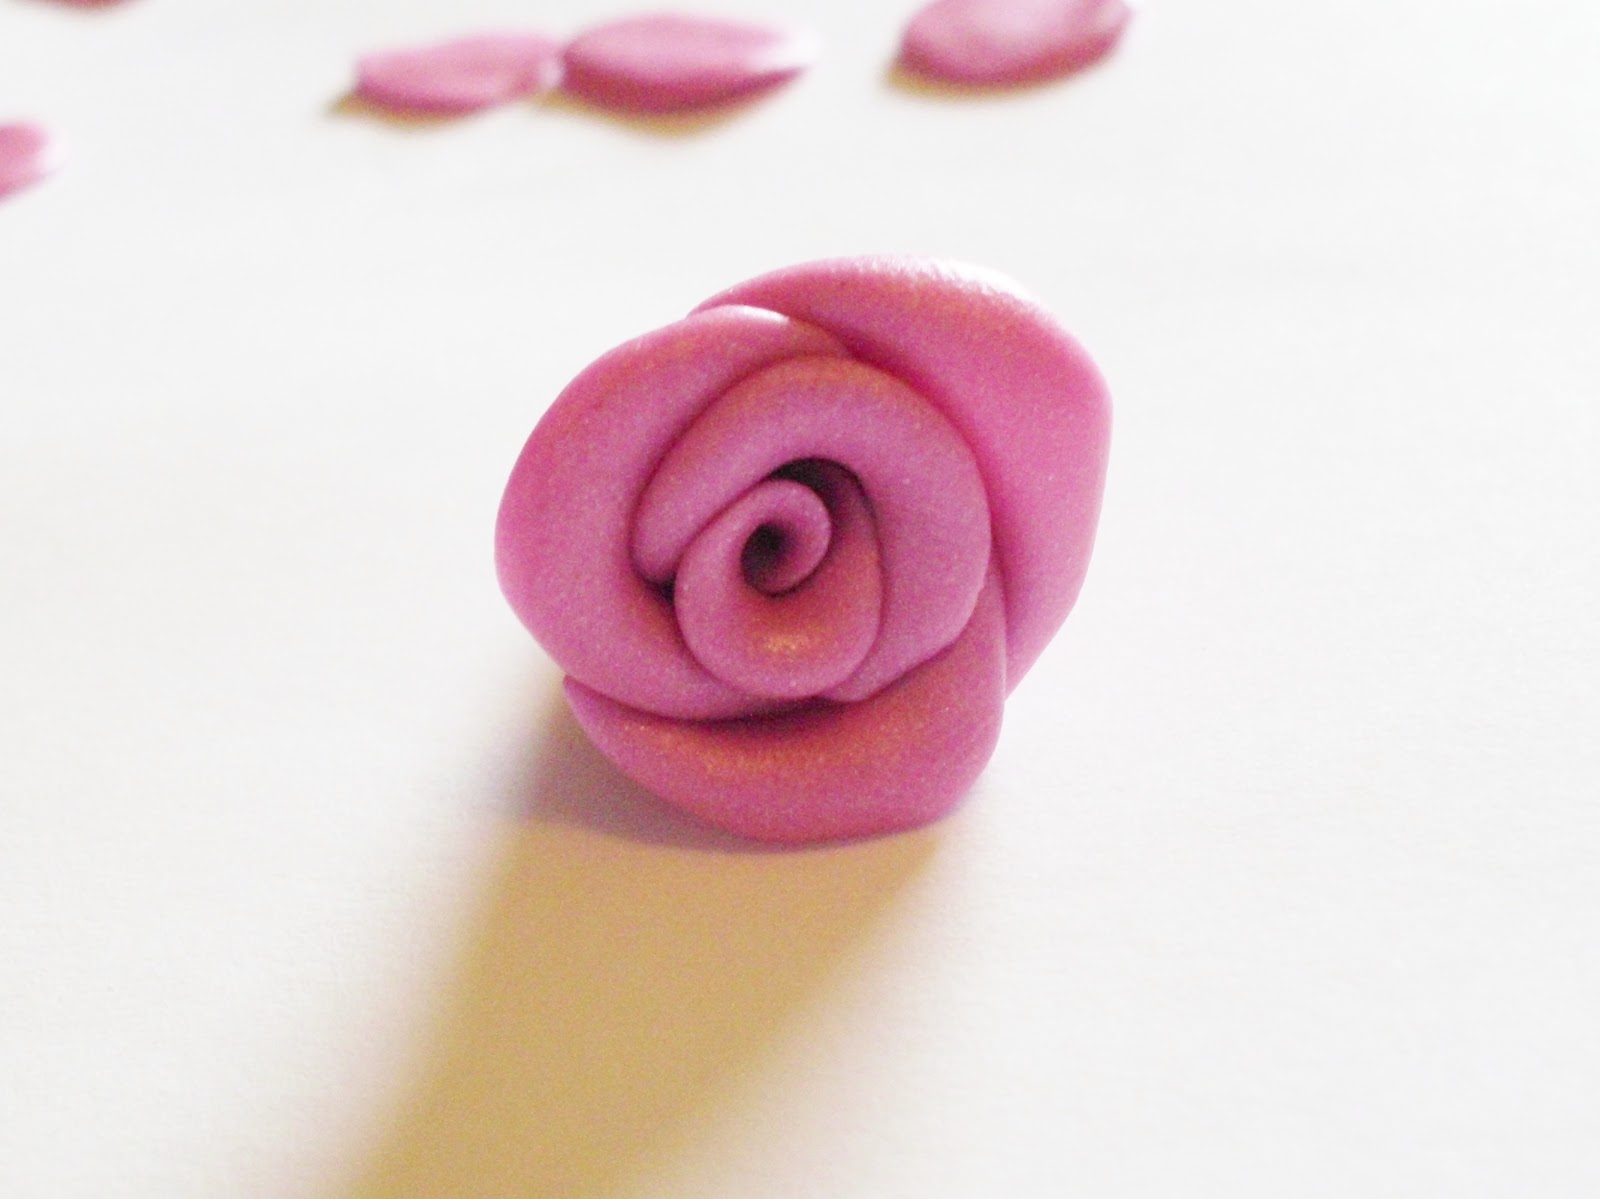
I am making a large rose for this demonstration because I can take better pictures of each step. In the background of the photo above, you can see the tiny pieces of clay used for the earrings.
The tiny roses are made the exact same way as the large roses.


Select one of the smaller pieces of flattened clay and roll it in a tube. This creates the center bud of the rose.


Here's the center completely rolled up. Once you finish rolling the tube, use your fingers to roll the top edge slightly backwards. You can see an example in the picture below.

Lay the next piece of clay in the center of the bud seam.

Now wrap it around the bud and slightly curl the top edge backwards.

The center of the next piece of clay goes over the seam left by the last piece.


Wrap it around the rose and roll the top edge slightly backwards.

Just continue laying the center of the next piece of clay in the seam left by the last piece of clay. Roll it around the rose and curl the top edge slightly backwards.


You may add as many or as few petals as you want.


I keep adding petals until I like the way the rose looks.


I have spent a long time sculpting a rose, carefully placing each petal only to roll it up and start over because I didn't like the way it looked.

If I need more clay, I will pull it from the underneath of the rose where the clay builds up.


Once you are happy with your rose, roll the excess clay underneath into a thin snake.

Cut the excess clay off.

Here's the finished rose. I'm not sure how many petals I added. Maybe 13 or 14?

Now decide the way you want your rose to hang and insert a head pin through the rose.
If you want your rose to stay the same as you made it then cup the rose in your hand while inserting the head pin. I kind of like the way it flattens slightly if I insert the head pin while the rose is laying face down on my work table.


Let's make the tiny roses for the earrings. Make them exactly the way the large rose was made.


Since we are making earrings, I lined up the flattened pieces of clay from smallest to largest.
I know I can't make identical roses but I felt that if I lined the clay up like this then perhaps the roses would be close to the same size.


Here are the 2 tiny earring roses. I think I added 7 petals.


Insert a head pin in each rose.


Remove the head pins and bake the roses per the instructions on the clay package. Since baking time depends on the thickness of the clay, I baked the larger rose about 5 minutes longer than the smaller roses.

Once the roses are cool, insert the head pin in the same hole you made before you baked it.
Using your round nose pliers, bend the head pin at a 90 degree angle.

Wrap the head pin around one side of the round nose pliers to form a loop.

Now hold the loop with the chain nose pliers and use the round nose pliers to wrap the head pin around itself.


Using the chain nose pliers, twist the loop open on the earring wire and attach one of the roses. Close the loop. Repeat for the other earring.


Your all done!!!!


So what became of the large rose???
Here it is! I inserted a head pin and wire wrapped just like the small roses. I added a chain and using jump rings, I added a clasp on one side of the chain and added just the jump ring to the other side of the chain for closure.

I hope you find this tutorial useful and will enjoy making polymer clay roses!
Don't forget to check out BareMoose for more polymer clay tutorials as well as other tutorials.

Happy Crafting!

Friday, June 29, 2012

Polymer Clay Cabochon Bracelet Tutorial

This is a cute little bracelet as is or you could add a flower or whatever you want to the center.
The addition of mica powder gives your cabochon a marbled and shimmery effect although it's hard to see in the photos.


Supplies Needed:

Cabochon link setting - in my supply shop
Clasp - in my supply shop
Chain
Jump rings
Sculpey polymer clay - translucent
Mica powder - bishop's violet
Sculpey gloss glaze
Wire cutters
Pliers
Condition a small amount of translucent clay by rolling it in your hands. Once conditioned, flatten the clay. Shake some mica powder (whatever amount you want) onto the clay.


Knead the mica powder into the clay.


Continue to knead the clay and mica powder until you are satisfied with the results.

The clay will be a bit flaky while you incorporate the mica powder but it will return to it's normal consistency.

Flatten the clay and gently press the cabochon link into the clay. This will give you a size guide.


The cabochon bezel link leaves a great impression.


Tear or cut away the excess clay around the bezel impression.


Smooth the edges of the clay with your fingers.

Place the clay into the cabochon bezel link and shape it into a cabochon with your fingers or your clay tool. I used my fingers on the cabochon above.
Bake the cabochon in the bezel according to the directions on the clay package. I baked the example at 275 degrees for 15 minutes.

Of course, you can skip this step but I put a coat of Sculpey gloss glaze on the example. I couldn't find a paint brush so I applied it with my finger. Before you do that, check to see if the bottle says "avoid contact with skin". You can apply as many coats of the glaze as you want. You may also sand the clay with very fine sandpaper.


It's time to assemble the bracelet using wire cutters, pliers, chain, jump rings and a clasp.

Attach the chain to one end of the cabochon bezel link using a jump ring and pliers. Lay the link in the center of your wrist and wrap the chain around your wrist half way. This will give you the measurement for the chain. Keep in mind your clasp will also add length to the bracelet. I cut my chains approximately 1 3/4".


Measure and cut 2 more chains using your first chain as your guide. Attach all 3 chains to one side of the cabochon bezel link using a jump ring.

Repeat the same steps for the other side of the cabochon bezel link.

Using your pliers, open another jump ring and place all 3 chain ends in the jump ring and close the ring. Try not to twist the chain.

Repeat for the other side but also place your clasp on this side before closing the jump ring.

Your all done!